Palo Alto VPN
Introduction#
Multi-Factor Authentication (MFA) is an extra layer of security used when logging into websites or apps. Individuals are authenticated through more than one required security and validation procedure that only they know or have access to.
RADIUS is a protocol commonly used to authenticate, authorize and account for user access and actions. Acceptto offers a simple solution for adding MFA to Palo Alto VPN via its Radius solution. This manual illustrates how to configure both a Palo Alto device and an Acceptto MFA solution.
Pre-requisites#
- An Acceptto RADIUS Agent that configured and connected to your user directory (for example Microsoft™ ‘Active Directory™’)(See this page for the instructions).
- A user with administrative privileges for the Acceptto Cloud dashboard.
- A user with administrative privileges for the Palo Alto device.
Configure the Acceptto RADIUS Agent#
To integrate Acceptto with Palo Alto, you will need to install an Acceptto RADIUS Agent on a machine within your network. This server will receive RADIUS requests from your Palo Alto, check with the LDAP server to perform primary authentication, and then contact Acceptto cloud service for secondary authentication.
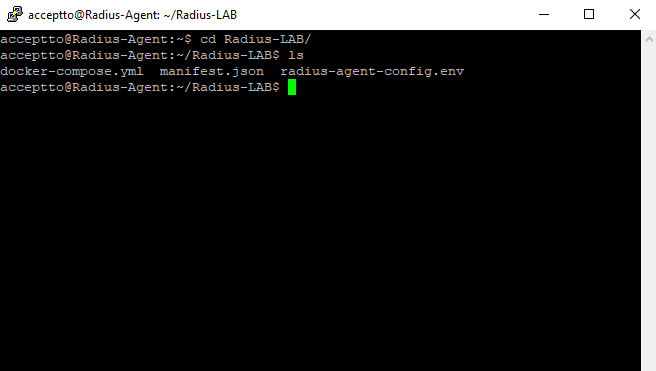
Log into the Acceptto RADIUS Agent with an administrative user and open the radius-agent-config.env file with an editor. It is located in the installed directory of RADIUS Agent. RADIUS clients are configured in this setting.
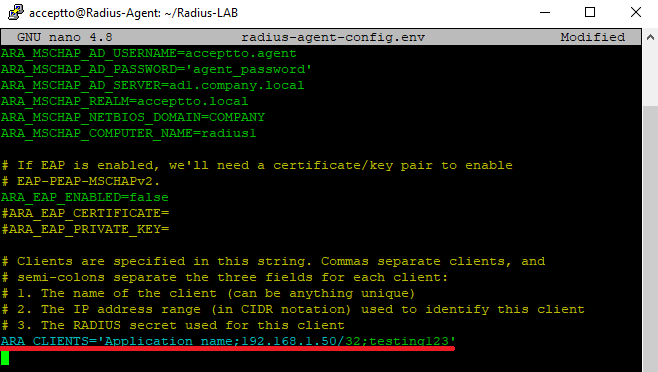
Go to the bottom of radius-agent-config.env file and change the ARA_CLIENTS attribute as follows. The values should be separated by semicolons (;).
ARA_CLIENTS = An optional name for your Palo Alto; Internal IP address of your Palo Alto; a shared secret
An example configuration might look like this:
ARA_CLIENTS = VPN;192.168.10.10/32;testing12345
Save the file and run the following command to set changes:
docker-compose down && docker-compose up -d
Configure the Palo Alto Global Protect Portal#
Configure a RADIUS Server:
a. Open the Palo Alto administrative interface and navigate to Device tab > Server Profiles > RADIUS and click Add.
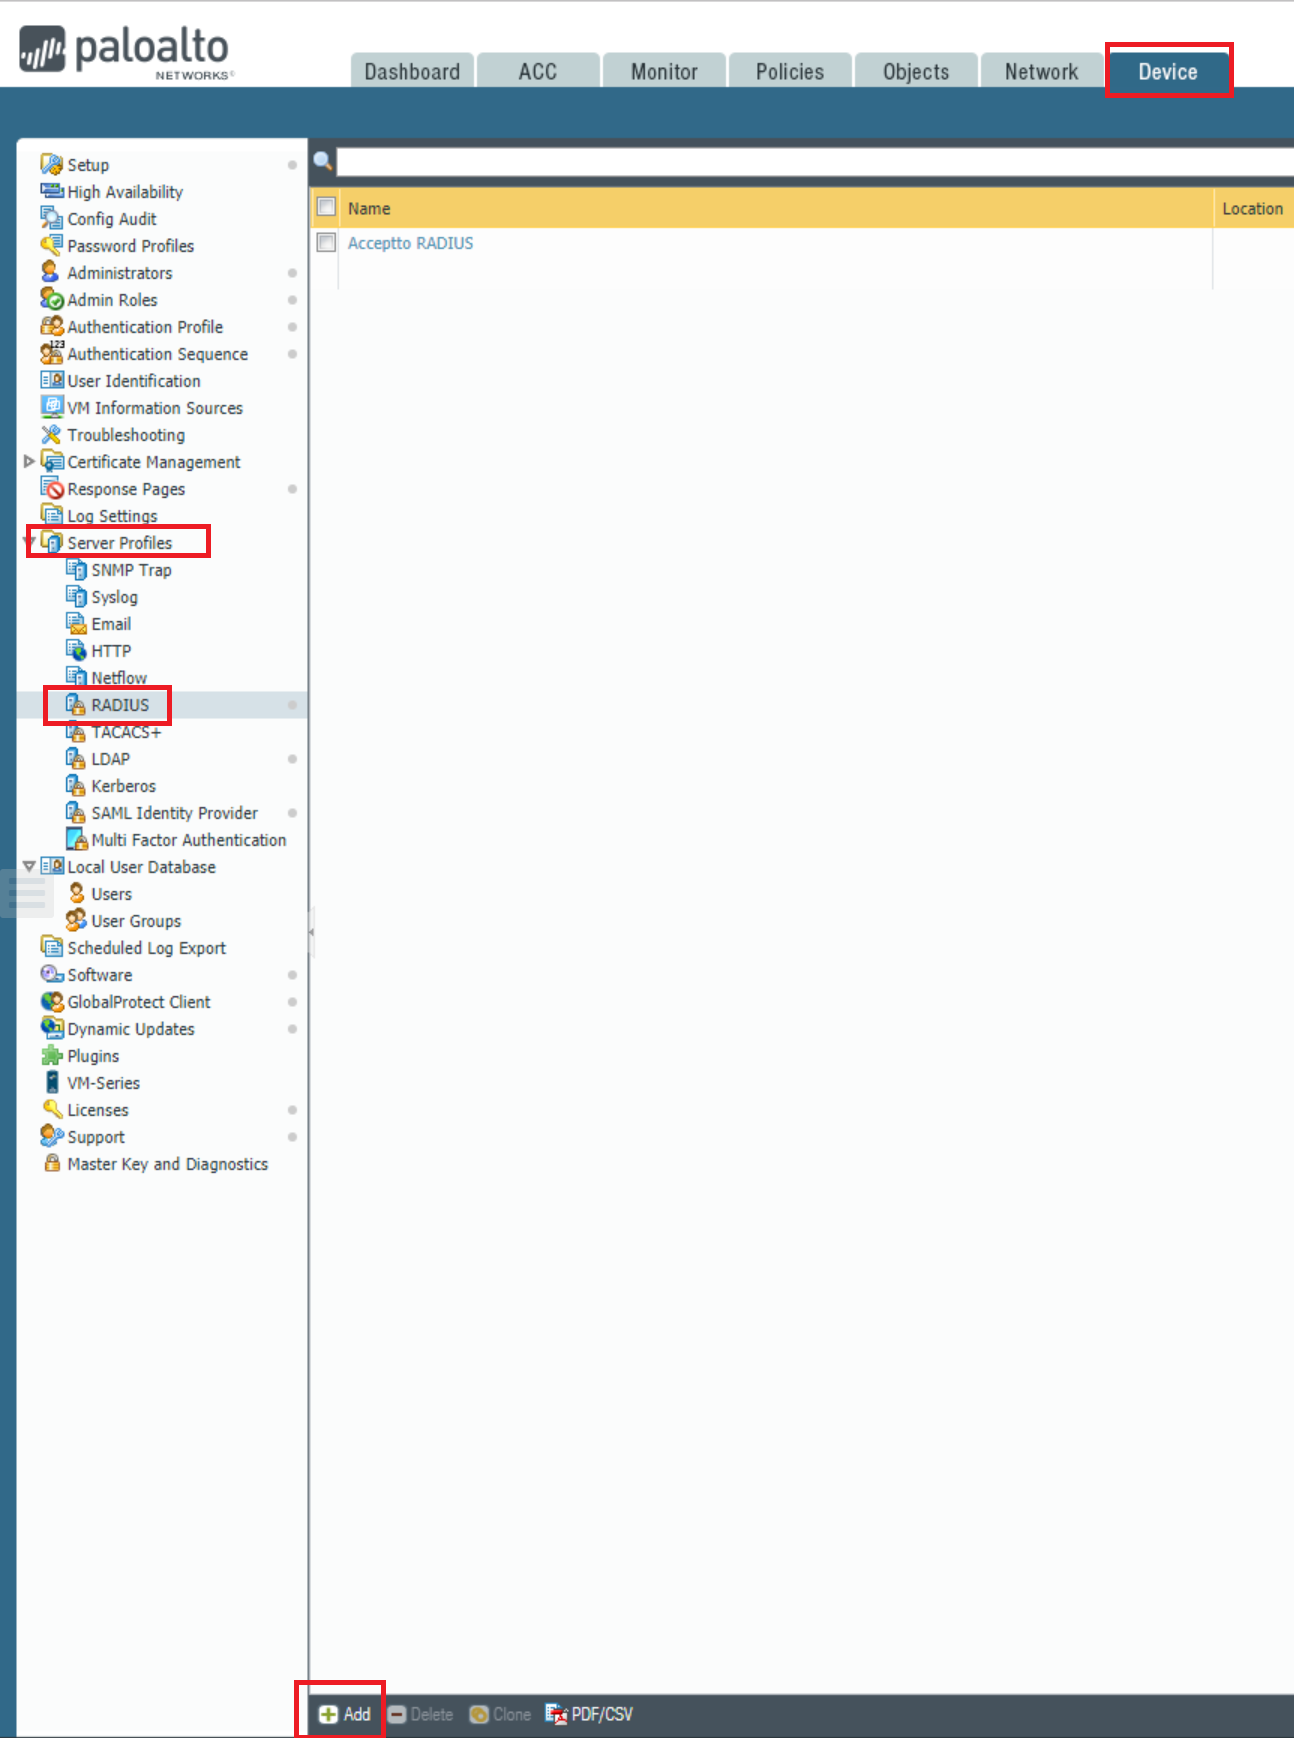
b. In the Server profile dialog, enter the configuration for your RADIUS.
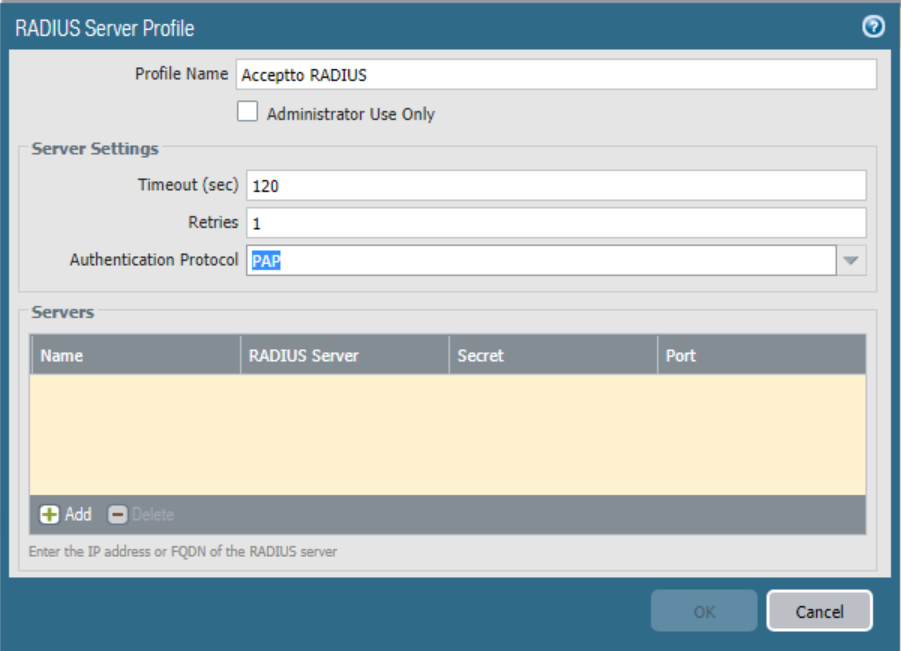
Profile Name: Enter a friendly name for this configuration.
Timeout (sec): 120 seconds
Retries: 1
Authentication Protocol: PAPc. Select the Add button at the bottom of the dialog to add a new RADIUS server.
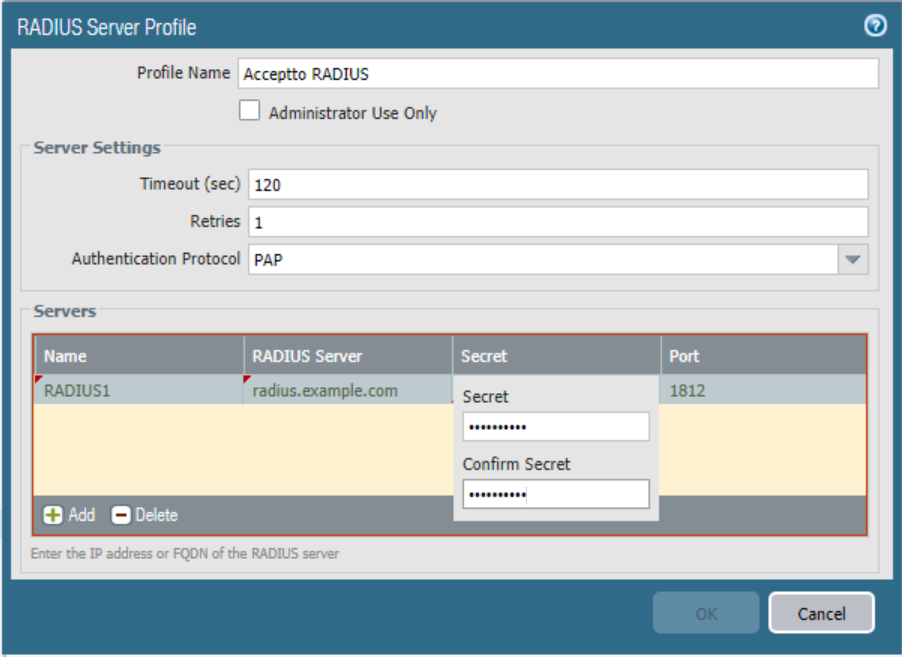
Name: A friendly name for the RADIUS Server.
RADIUS Server: The IP address or Fully Qualified Domain Name (FQDN) of your RADIUS server.
Secret: The string used to authenticate the Palo Alto Device to the RADIUS Server.
Port: Leave this unchanged.d. Select OK, and then Commit. Your new RADIUS Server Profile is ready to use.
Create an Authentication Profile
a. Select Device > Authentication Profile > Add.
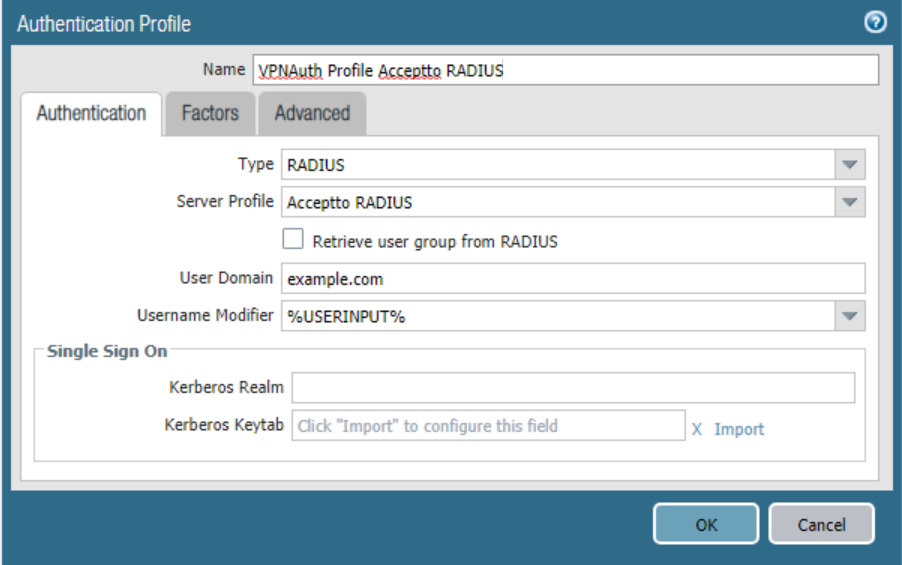
Name: A friendly name for the Authentication Profile.
Type: RADIUS
Server Profile: The Server profile created in the previous step 1.b.
User Domain: The domain used by your users (Optional)b. In the same dialog, select the tab Advanced and then select “ + Add “.
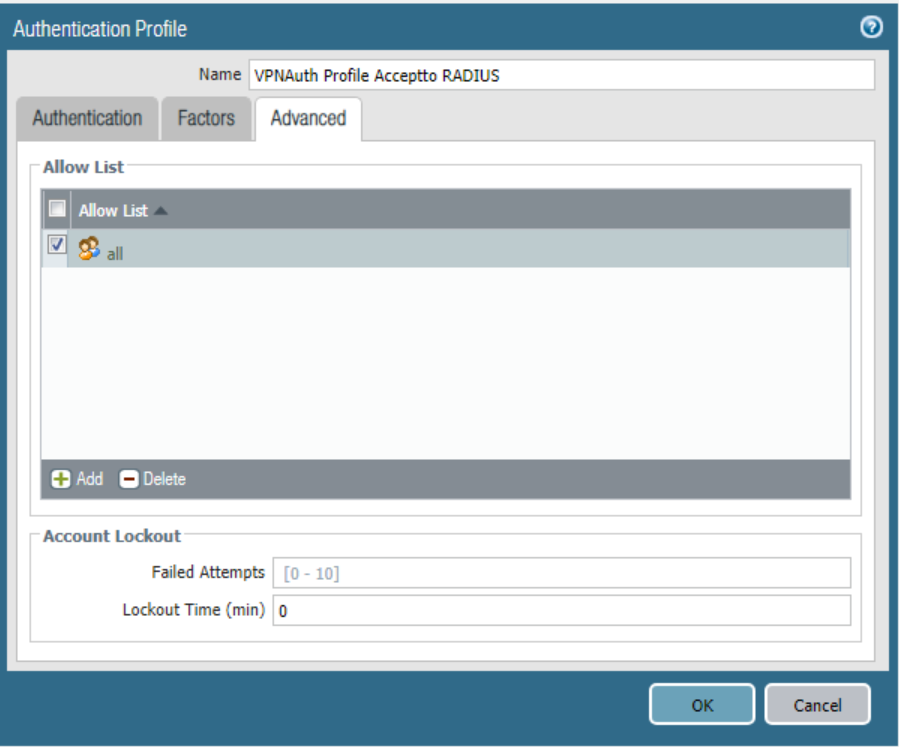
Allow List: Select all or the user group(s) that you want to use for this authentication profile.
Failed Attempts: Configure this setting according to your security policy. (Optional)
Lockout Time (min): Configure this setting according to your security policy. (Optional)Associate the RADIUS Server Profile to either a new Portal or an existing one.
a. In the Palo Alto administrative interface, select Network tab > Global Protect > Portals. Click Add.
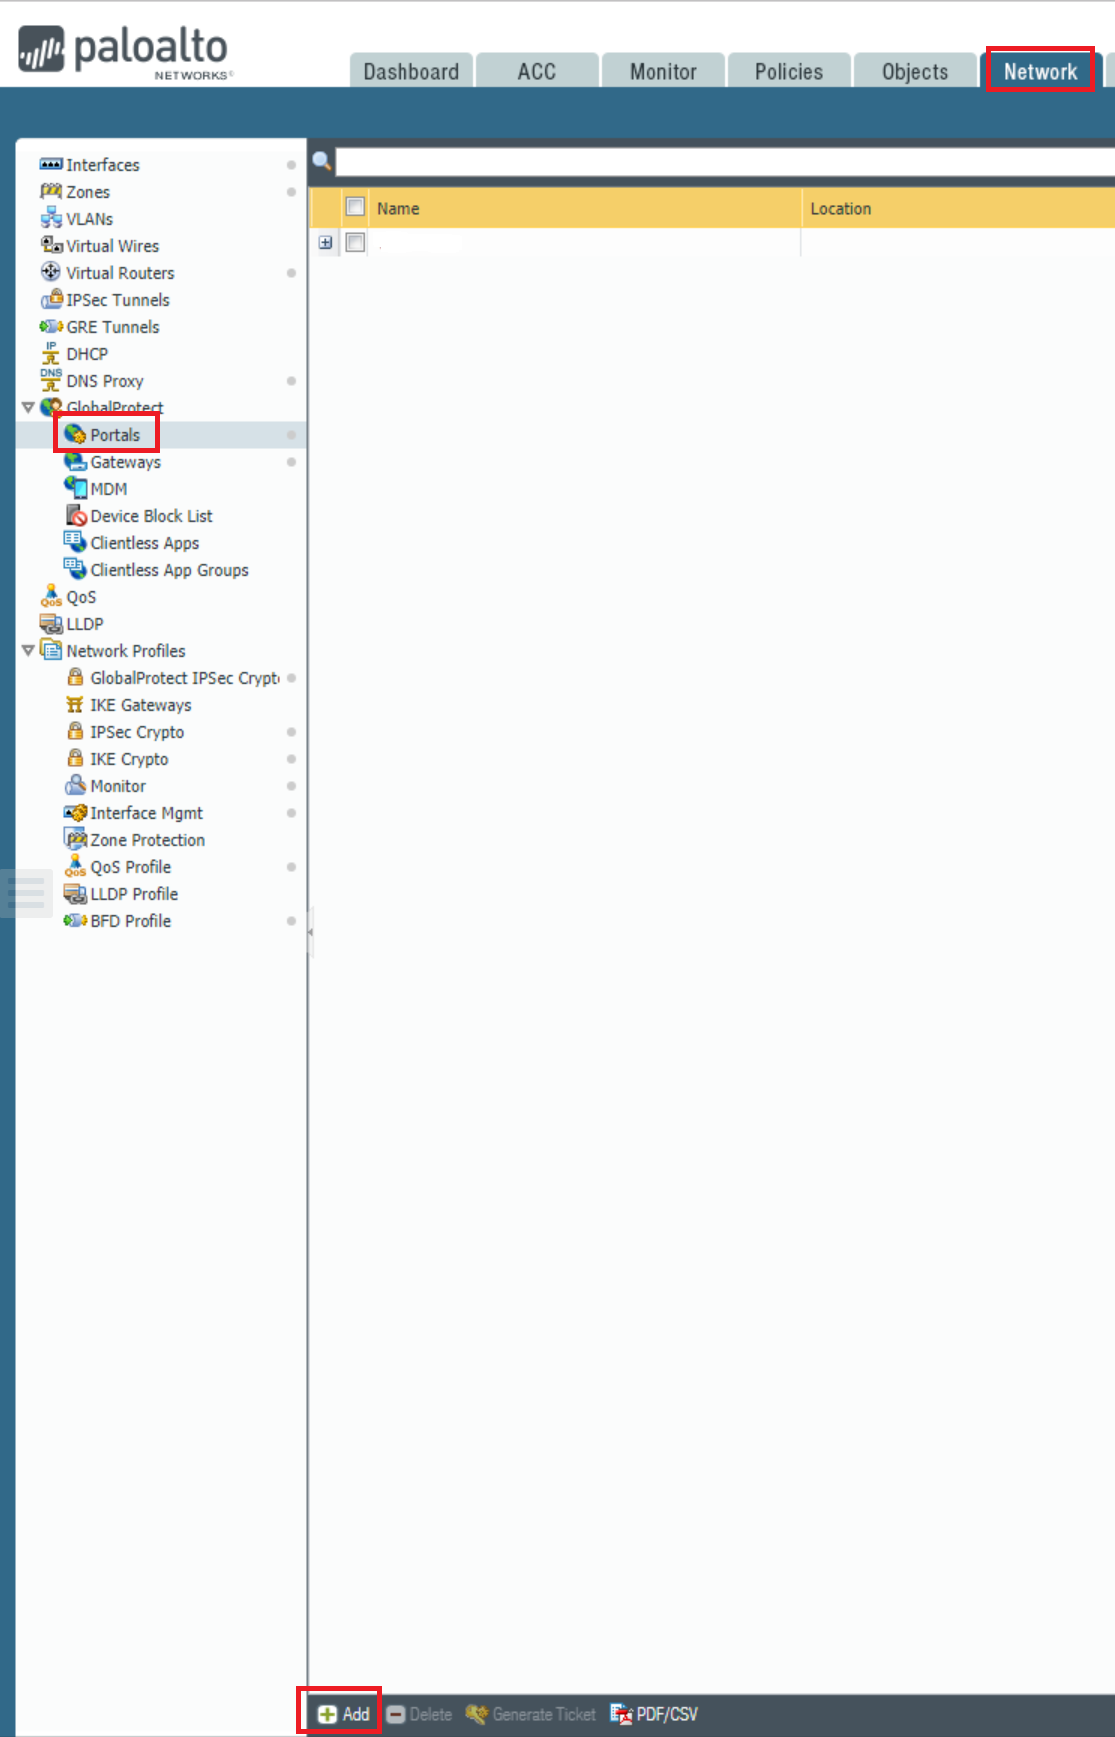
b. Select the Authentication tab. Change or add the desired authentication method to use with the Authentication Profile created in step 2.
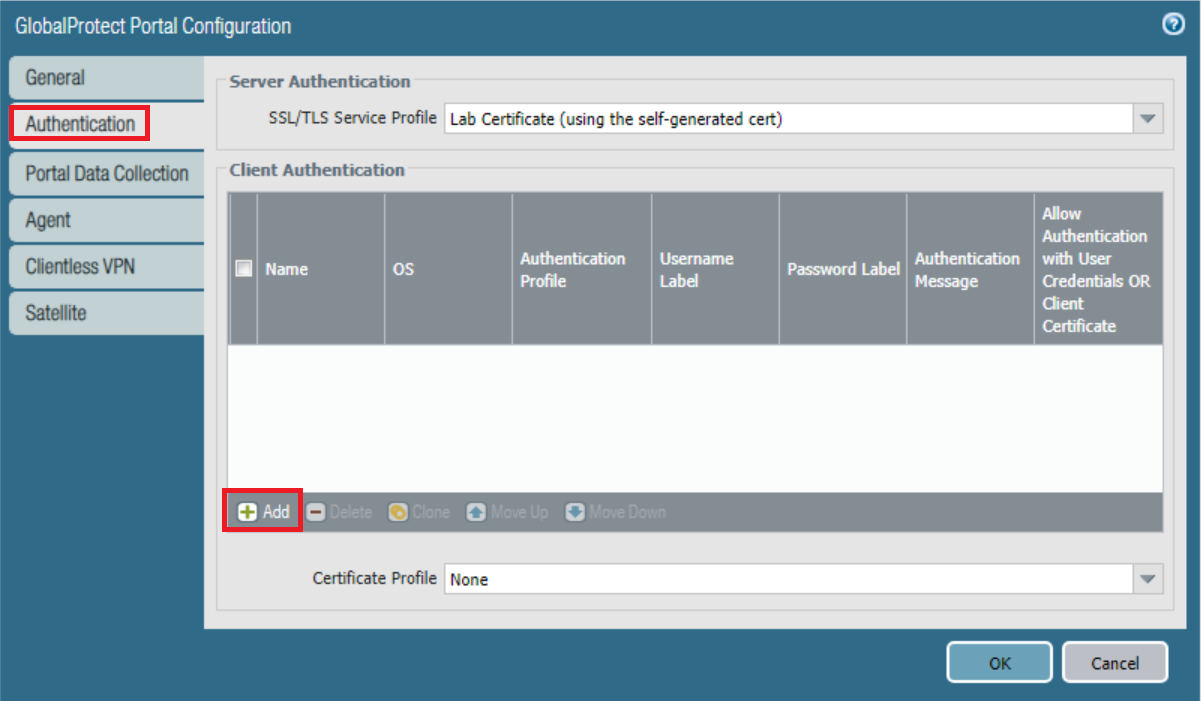
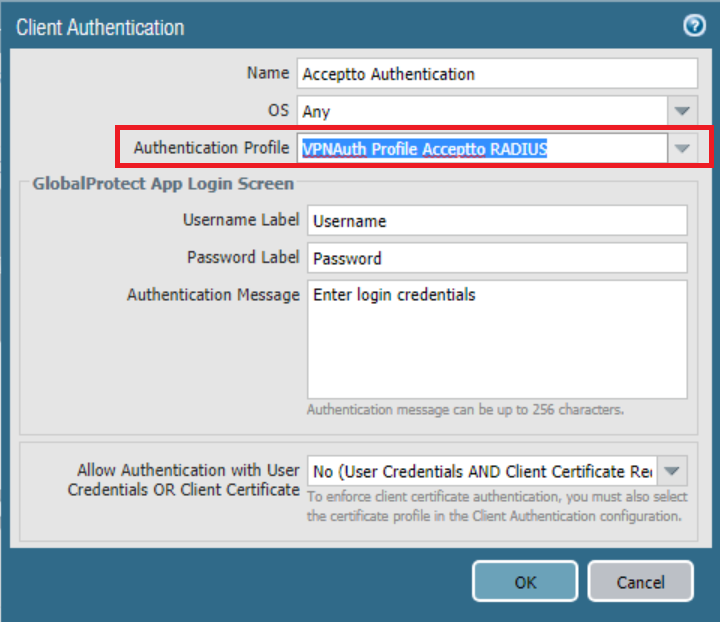
c. Select OK and Commit.
Test your setup#
Open a console session to the Palo Alto device.
a. Type test authentication authentication-profile " VPNAuth Profile Acceptto RADIUS " username demo password, where "
VPN Auth Profile Acceptto RADIUS " is the profile created in step 2,
username demo is a valid user of your Active Directory
the command prompt will ask you to input the user’s password.
b. The expected output should be similar to:
Do allow list check before sending out authentication request… name "demo" is in group "all" Authentication to RADIUS server at radius.example.com:1812 for user "demo" Authentication type: PAP Now send request to remote server … Authentication succeeded against RADIUS server at radius.example.com: 1812 for user "demo"c. After the line "Now send request to remote server", the mobile device associated with the user account should receive a push notification. Approval of the user notification should then cause the line "Authentication succeeded…" to appear.
d. If the push notification is rejected then the message "Authentication failed…" will appear.
You can also verify the configuration using the Global Protect VPN Client.
a. Download and install the Global Protect Client. See this link for further information on how to obtain the GlobalProtect Client.
b. Open the Global Protect Client and select the cog icon on the top right-hand corner. Select Settings to open the GlobalProtect Settings menu.
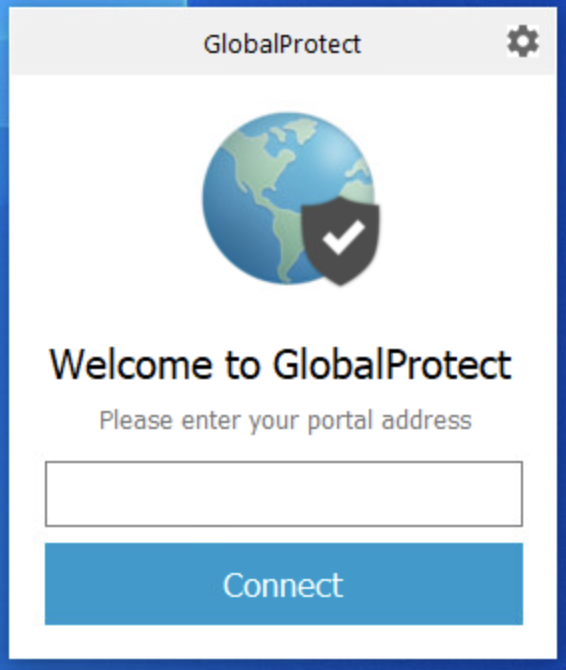
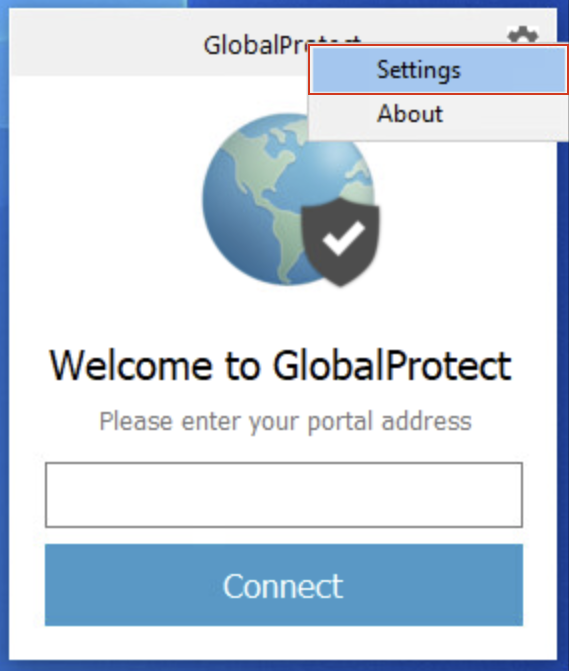
c. Select Add to configure the portal created in "Configure the Palo Alto Global Protect Portal".
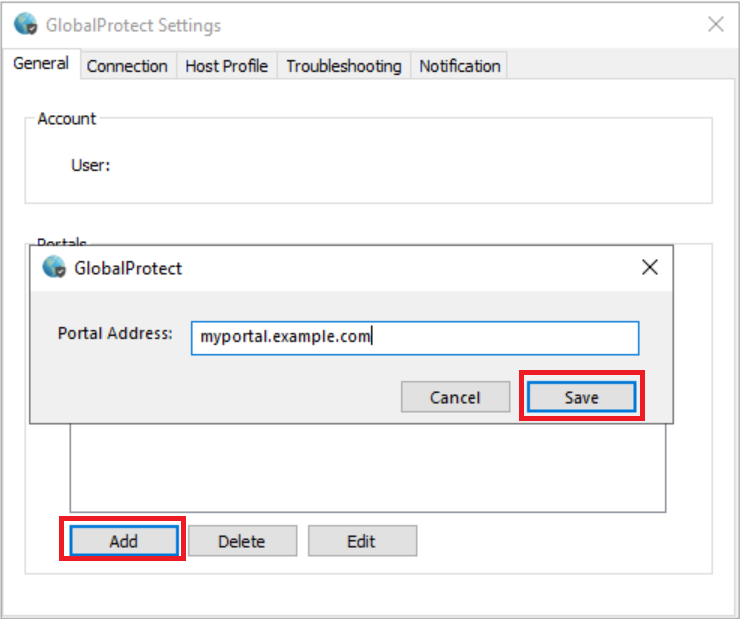
d. Open the GlobalProtect client and select Connect.
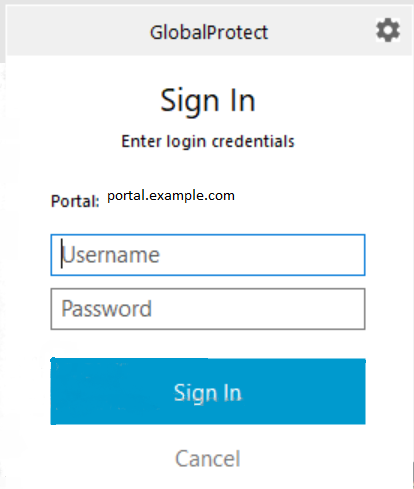
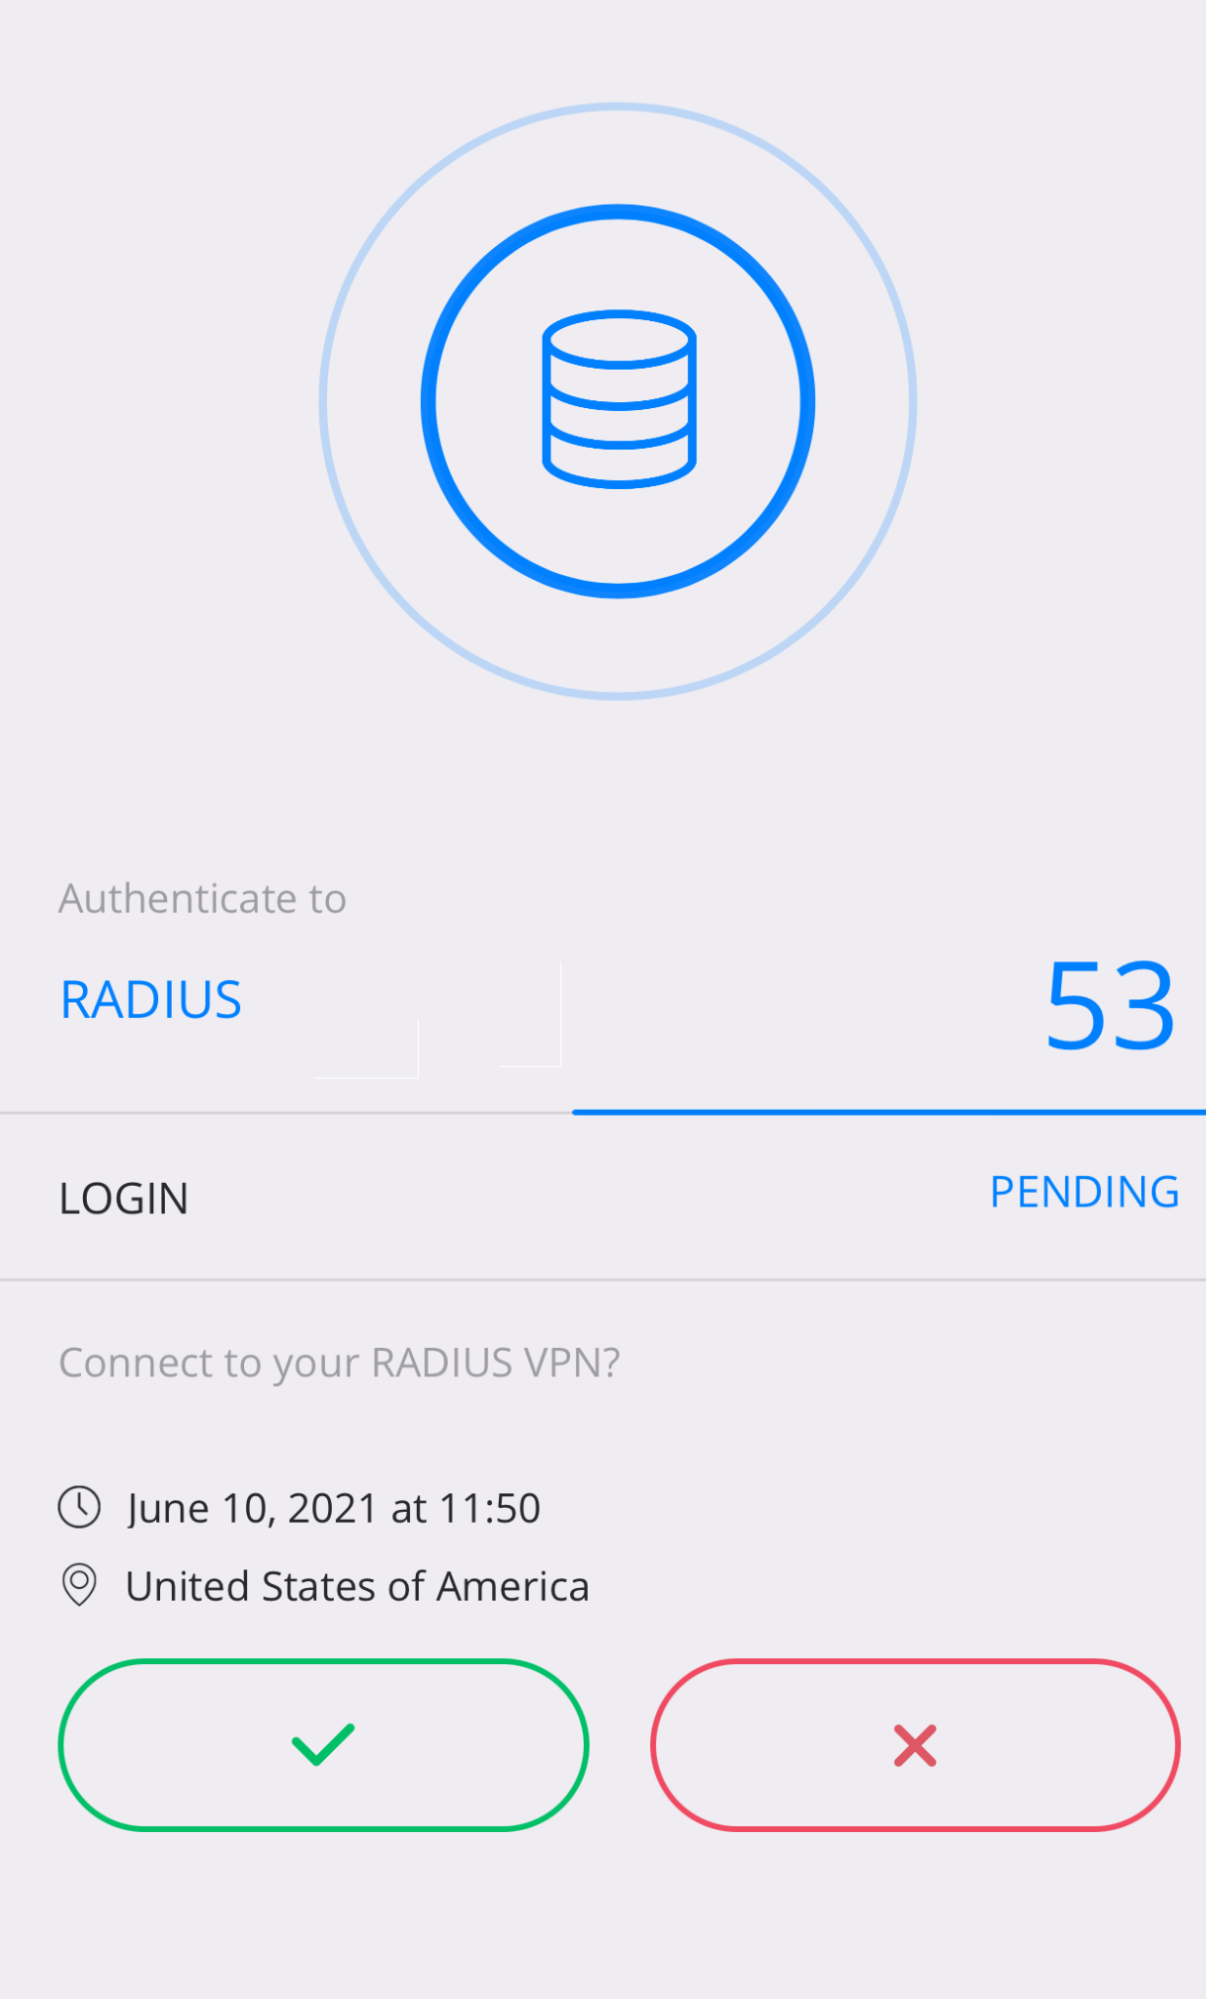
e. A push notification is sent to your mobile device. Approval of the push notification will complete the VPN connection.
Support#
If you require assistance, please email us at support@acceptto.com
Sales#
Want to learn more about our MFA solutions? Contact our Professional Services for a Demo today.
Disclaimer#
All company, product and service names used in this document are for identification purposes only. Use of these names, trademarks and brands does not constitute endorsement by the Acceptto Corporation.
Palo Alto Networks are trademarks of Palo Alto Networks® and/or one or more of its subsidiaries, and may be registered in the United States Patent and Trademark Office and in other countries.